
By Squeek Vermintide @ http://chatteringhorde.blogspot.com/
Grey Seer Stage-by-Stage Painting Guide

So here we go...
(scroll down for finished pics at the end...)
1. Assembly.
- File down or carefully cut away any flash from the model.
- Glue to base.
2. 1st Basing.
- Paint watered-down PVA glue to the base.
- Dip base into modelling sand
- Shake away excess and leave to dry
3. Undercoat.
- Undercoat whole model Chaos Black (I use GW Spray paint.)

4. Drybrush base.
- Calthan Brown.
- Snakebite Leather
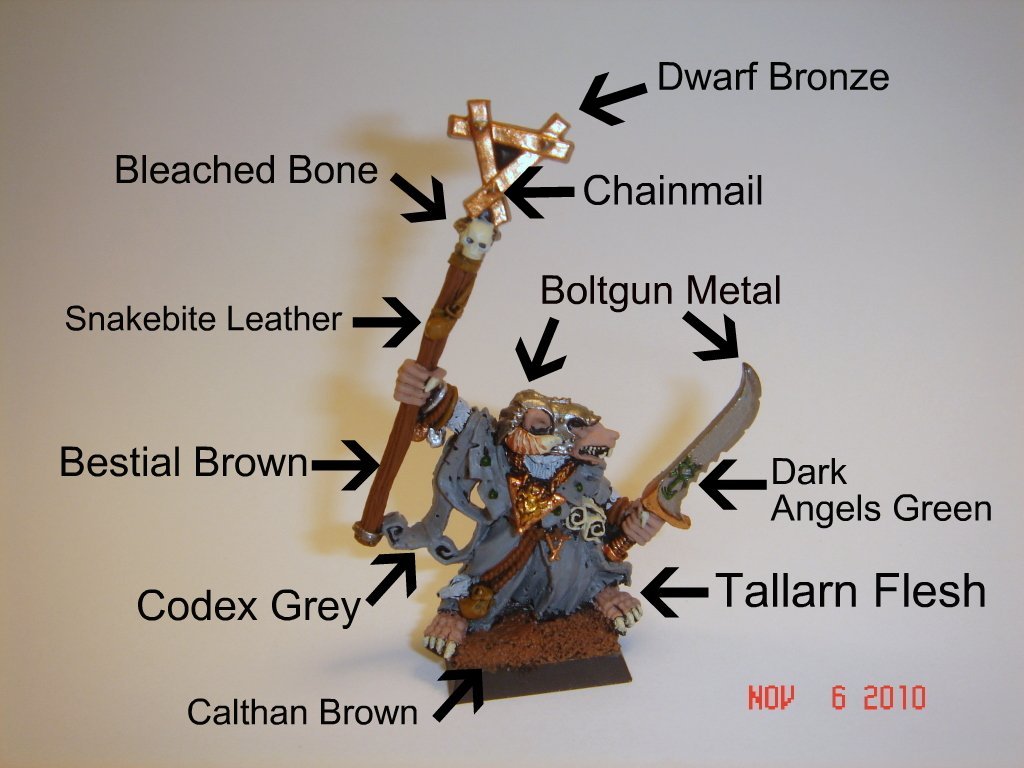
5. Basecoat.
Apply base colours to all parts of the model.
- Boltgun Metal: Sword, helmet, base of staff.
- Tallarn Flesh: Hands, tail, feet.
- Dwarf Bronze: Staff symbol, guard on sword, talisman on chain, and chain.
- Bleached Bone: Skull on staff, horns on helmet, nails on hands/ feet, scrolls.
- Dark Angels Green: Sigil on sword, warpstone studs on robes.
- Fortress Grey: Fur.
- Bestial Brown: Staff, belt.
- Snakebite Leather: Leather pouch on belt, leather pouch on staff.
- Chainmail: Bolts on staff symbol.
6. Layers. (Before washes)
- Robes: Codex Grey/ Fortress Grey(50/50 Mix), then Codex Grey Fortress Grey (25/75 mix) and finally Fortress Grey with some Skull White (75/15 mix).
- Leather/ Leather Pouches: Snakehide Leather/ Skull White (50/50 mix)
- Skulls: Skull White over Bleached Bone.
7. Washes.
- Skin, Tail/ Ears: Ogryn Flesh.
- Everything else(!): Devlan Mud.
8. Highlights. (After washes)
- Armour/ weapon edges (e.g. Helmet): Chainmail.
- Nails on staff symbol: Mithril Silver.
- Skull: Bleached Bone/ Skull White (50/50 mix)
- Skin/ Tail/ Ears: Tallarn Flesh/ Dwarf Flesh (50/50 mix)
- Warpstone: Snot Green/ Skull White (75/25 mix) then building up...Snot Green/ Skull White (50/50 mix), Snot Green/ Skull White (25/75)
- Skin (Hands, Feet etc.): Dwarf Flesh/ Tallarn Flesh (50/50 mix) and/ or Dwarf Flesh/ Elf Flesh (50/50 mix)
7. Drybrushing.
- Staff symbol: Dwarf Bronze.
- Robes: Fortress Grey.
- Staff: Bestial Brown/ Skull White (75/25 mix)
8. Final Basing
In this case, I decided not to add anything to the base other than the colours added previously, but if you wanted to...
- Dab on a couple of spots of PVA glue.
- Dip in flock.
- Shake away excess and leave to dry.
Done!
...or not QUITE done, because following advice and comments on other models, I decided to have a go at adding some verdigris to the Dwarf Bronze staff symbol. I had tried this before and so followed the same method.
9. Verdigris Wash.
- Heavily water down ICE BLUE (10 parts water to 1 part Ice Blue.) You'll need to experiment to find the right balance of water/ paint...
- Paint or dab onto the bronze symbol, so wash gathers in recesses or raised areas. Feel free to apply quite heavily, but be careful it doesn't drip down the staff.
- Using a rolled up piece of tissue paper (so it has a point) carefully dab or drain away wash from flat surfaces, leaving the wash gathered around raised areas or in recesses.
The finished product.


This is exactly what I've been looking for, for sooo long. My Seer has been sitting around, anticipating the day I'd finally find a source of inspiration.
ReplyDeleteThis is a great guide, I look forward to try it out. Would it be okay if I linked to you, on my own skaven-paint-blog?
Regards : )